Tips & Tricks to fix Roadrunner Email Problems

Is it that you are coming across Roadrunner email problems? However, it’s not that the Roadrunner email service is the top-most email service. These issues are not because of any problem in Roadrunner email but because of technical faults. And these issues can occur to any of the digital grounds. Well, these problems can be resolved easily without making much effort. Read and apply the steps given to fix the issues. If you failed to understand then you simply have to connect with the expert and know if you get stuck in any situation.

Roadrunner Email Problems.jpg

Frequent Roadrunner Email Problems

These are some most common Roadrunner email problems users come across:

• Syncing issue in Roadrunner
• email
• Login email address is incorrect
• Roadrunner email got hacked
• The problem in resetting your password
• Error in signing in your account
• Forgot password of your account
• Problem with outgoing email
• connection
• Unable to set POP3 and IMAP server problem

Reason for Roadrunner email problem occurrence

• Slow internet connection
• System requirements are not compatible
• Another file may oppose the file
• Server Unresponsive
• Cache and viruses may block the file
• Wrong credentials
• Incorrect IMAP and POP settings

Effective Steps to resolve Roadrunner Issues

Roadrunner Email problems can occur anytime. Thus, you should know the precautions so that you can apply them whenever it’s required:

• Cross-check the server settings of the network
• You can open your roadrunner account on http://www.rr.com if application isn’t working
• Try to resolve the SMTP server connection
• Inspect the IMAP and POP settings
• Mention the correct username and password
• Cross-check by sending mail to your friend
Furthermore, there are server settings, you need to follow. Go through the blog and solve the issue.

Fix the Roadrunner Issues in Android

Did you try to access Roadrunner email via Gmail on your android? Use IMAP and POP settings with the below steps:

1. Firstly, open mail in your Android device
2. Then, enter your Roadrunner email address and click Next
3. Choose POP3 and click ‘Next’
4. Then, type Roadrunner password
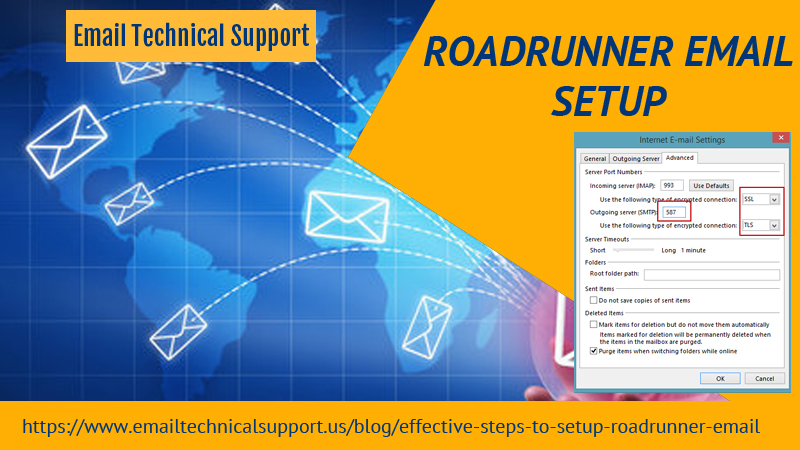
5. Next, in the incoming server, mention the following details:

• Username: enter full email address including @maine.rr.com
• Password: type Roadrunner webmail password
• Server: pop-server.maine.rr.com
• Port: 110
• Security Type: None

6. Next, Outgoing Server Setting Information:

• Server: smtp-server.maine.rr.com
• Port: 587
• Security Type: None
• Require sign-in: Tick mark
• Username: username@maine.rr.com
• Password: Your Roadrunner email password
• Tap ‘Next’ and then click on ‘Next’ again
• Thereafter, mention your name in the required box (All recipients will see your name)
• Click ‘Next’
• In case, the above settings fail to work choose alternative server settings:
• Incoming server: pop-server.rr.com
• Outgoing server: smtp.rr.com


How to fix Roadrunner problem on iPhone?

For resolving Roadrunner email problems in iPhone, follow the below steps:

1. Navigate to Settings option
2. Then choose Mail, Contacts, and
3. Calendars and then click Insert Account
4. Choose Additional>Add Mail Account
5. Type the title Address: enter your roadrunner user name
6. Click ‘Next’

• Incoming mail server host:
• pop-server.Ec.rr.com
• Username: enter complete
• email address
• Accounts: mention password
• Port: 110

7. Now fill Outgoing Mail Server:

• Outgoing Mai server host:
• mobile-smtp.roadrunner.com
• Username: type RR username
• Password: RR password
• Interface: 587
• Un-tick Secure Survey

8 Tap Save


Instant Technical Assistance

Were you able to resolve the Roadrunner email problem? If the answer is no then you need to tackle the problems with the help of experts. Try to get in touch with the professionals and put forward your concern to them. They will bring out the best workable solution to your problem. You simply have to apply them accordingly and your issue will be resolved. The service is active throughout day and night, 24*7.

Source Link :- https://medium.com/@jemasjoin/tips-tricks-to-fix-roadrunner-email-problems-99e657a4bc32

Beginner’s Guide for basic Details About AOL Mail

AOL Mail is meant to be the best platform for communication. It gives the opportunity to the users to connect with their closed ones like your friends, families, clients without any glitch. But how will you be able to perform this? To enjoy its functions and features, you need to have an email account via email provider. This AOL mail service flourishes the business in abundant ways be it sharing large size files, communicating files, customizing features, etc. Furthermore, creating AOL email account is a very simple process i.e. simply visits mail.aol.com login page and setup your account. Read further to know more read further.

What are the advantages of AOL Mail Account?

Here are few pros of AOL Mail, you must know:

  • Free of cost usage i.e. users need not spend money
  • There is the option for AOL app if you want to sign in your other devices
  • You can create multiple usernames during AOL mail sign in under one account
  • Unlimited memory storage for your emails
  • It has unique feature of blocking unwanted messages or spams
  • Allows creating an online address book for safety or saying you do not lose important contacts

System Requirements for AOL Mail Login

Before you sign in you must know the requirements:

  • Compatible Operating System like Windows 7, 8, 10
  • Web browser- Firefox, chrome, safari (for both Windows & Mac)
  • Good Internet connectivity
How to create AOL account?

Follow the steps given below and apply them accordingly:

  1. Visit to AOL .com website
  2. Tap on the link which says create a new AOL account
  3. Then enter the required details like username, create password, confirm your password, date of birth, phone number, etc
  4. Choose the desired sign in AOL email address
  5. Thereafter, you will receive on the phone number mentioned in sign-up page
  6. Confirm the ownership of your AOL mail account

Congratulations! Now you are ready to use the AOL account

If by chance, you lost the access to your account, get it recovered:

 Process to recover your AOL Mail account

  1. Navigate to login page of AOL
  2. Type your username or email address
  3. Then, tap on ‘Forgot Password’
  4. Tap on ‘Create New Password’
  5. Thereafter, enter the asked details correctly to verify your identity
  6. Ensure that you have access to your phone number or the alternate email address during sign up process
  7. Mention the code you received
  8. Once verified, you will successfully recover the AOL mail account

At times, there may arise some of the other technical issues. However, it’s not a big issue, as it can be rectified.

How to troubleshoot AOL Mail Issue?

The major issue the users face is that they are unable to send emails. But, it’s not because of some external fault. Thus, you can easily rectify by cross-checking the following points:

  1. Restart your system: Try to restart your computer. It’s the most basic step that helps to clear the internal memory of your computer
  2. Verify your Display name: Try to change your display name if it’s saved with AOL. The reason behind it is because the message won’t disappear if there is a combination of AOL in your display.
  3. Use another web browser: Choose another web browser to access AOL mail because there might be chances that the current browser is not compatible.
  4. Clear your browser’s history: You should clean your browser history and delete all the cache’s to bring the browser to the normal state. This wipes out all the unnecessary information.

Lastly, if you require any help regarding AOL mail you can connect with the experts and convey your query to them. They are highly experienced and can revert you with accurate solutions.

Source Link  :- https://jemasjoin1.blogspot.com/2020/02/beginners-guide-for-basic-details-about.html

Get your Yahoo mail server settings issue Quickly solved

Yahoo mail server settings allow users to access their emails free. Well, it came into being when Gmail introduced it. With the email server settings i.e. POP and IMAP, users can manage and organize their email from email clients like Outlook, iOS mail app, thunderbird. IMAP server settings make sure that users can use Yahoo folders in both the email programs and browsers. Adding on, the user needs to configure SMTP settings for sending mails using your account.

yahoo mail server settingsWhat are IMAP, SMTP, and POP?

In simple words, let’s know each abbreviation simultaneously. The Internet Mail Access Protocol (IMAP) performs the receiving and viewing of messages. Then, Simple Mail Transport Protocol (SMTP) works to send outbound messages. Well, POP (Post Office Protocol) is an older version that used to look after the receipt of messages. More precisely it can be said IMAP is an improvised version. It allows syncing messages with the server, so many devices that you are using to connect Yahoo mail account; all will see the same thing. Therefore, if you want to access your Yahoo account you will IMAP and SMTP plays an important role.

Process of IMAP and SMTP Settings

As discussed above, Yahoo mail will work only when SMTP and IMAP Server settings are properly configured. Enter these below settings:

  • Yahoo Mail IMAP server: mail.yahoo.com
  • IMAP port: 993
  • TLS/SSL: yes
  • user name: Your full Yahoo Mail address
  • password: Your Yahoo Mail password or app password
  • Yahoo Mail SMTP server: smtp.mail.yahoo.com
  • SMTP Port: 465 or 587
  • TLS/SSL: yes
  • username: Your complete Yahoo Mail address
  • password: Your Yahoo Mail password

How to Configure Yahoo Mail in Outlook?

Although Gmail introduced the server settings users need to always enable IMAP or POP before you start the work whereas in Yahoo it’s already enabled. Now, if you want to configure Yahoo mail in Outlook follow the below guidelines:

  1. Open Outlook
  2. Tap on the file and click Add Account
  3. Now on next screen, click on Manual setup or additional server types
  4. Remember: Unlike other email platforms, you need to manually enter the details of the server. Thus, do not click Email Account option in haste.
  5. Furthermore, click POP or IMAP option then tap ‘Next’
  6. Next, you need to carefully enter the server and login details.
  7. Firstly, enter your name or full Yahoo email address.
  8. Thereafter, choose IMAP for the account type. Also mention the below information:
  9. Incoming mail server: imap.mail.yahoo.com
  10. Outgoing mail server: smtp.mail.yahoo.com
  11. Next, tick-mark on ‘Require logon using Secure Password Authentication’
  12. After that, tap on ‘More settings’ option
  13. Now, in the outgoing server, tick-mark ‘My Outgoing server’ requires authentication
  14. Then, click on Advanced tab
  • IMAP port: 993
  • SMTP Port: 465 or 587

Thereafter, choose SSL and click OK

In case, you want to PO3 instead of IMAP then, apply the following details:

  • Incoming mail server: pop.mail.yahoo.com
  • Outgoing mail server: smtp.mail.yahoo.com
  1. Then, go to More Settings, use
  2. Next, tick-mark ‘This server requires encrypted connection SSL’
  3. Now, from outgoing server choose SSL
  4. Lastly, tick-mark ‘My Outgoing Server requires authentication box’
  5. You tap on Send/Receive all folders button. All your emails will start loading in Outlook.

However, if you get stuck in any yahoo mail server setting step to try to connect with the expert’s team. They will guide you with the steps explaining them briefly.

Source Link :- http://jemasjaoin1.booklikes.com/post/2058374/get-your-yahoo-mail-server-settings-issue-quickly-solved

How To Create Webmail Roadrunner Login Account?

Roadrunner is a leading email service being accessed by millions of users for their personal as well as professional work. The Roadrunner email service is basically offered by a popular communication-based company, Time Warner Cable (TWC) Internet Service Provider. Users with TWC account can easily be logged in to Roadrunner Webmail and enjoy the benefits of its amazing features. If you have not created an account yet, then you must require immediately do this to avail all its range of services. This blog is intended to give effectual information related to log in to Roadrunner‘s email. So, stop wandering here and there for the assistance. Simply, keep your eyes feast on the written-content.

Features Of Roadrunner Webmail Email

  • Take a brief look at below points to know why everyone is fond of using Roadrunner email:
  • It is simpler to customize it
  • It has Unlimited storage capacity to store the file
  • It has advanced spam filter policy
  • Loaded with 30MB attachment option
  • It has a convenient web interface
  • Integrated with security features to make your data safe

Some Points To Remember Before Creating Webmail Roadrunner Login

  • You should use TWC username in 6 characters while account creation
  • Don’t start and end with a symbol on username
  • In order to make the account more strong, use more & more symbols

Desired Steps To Create Webmail Roadrunner Login Account

If you don’t know how to start for creating an account, then don’t worry! You have landed at right page. Have a glimpse at given instructions and follow the same accordingly:

  • Open the official website of TWC on your system
  • “Register” option will display on the screen just next to the “Remember my username” option
  • Tap on “Register” button to begin the account registration
  • After doing that, a next window will pop-up on the computer screen
  • On that page, you have to enter the Zip Code and other contact details
  • Fill-up your personal details like name, contact number, etc. into the desired box
  • During account creation, some security question will also be asked. Choose as per your convenient and answer the question correctly
  • After providing entire basic information of yours, click ‘Submit’ button
  • At the end, your TWC account is created now

Now, you can freely access your Webmail Roadrunner Login by simply step-to-step follow its login process. Well, land to the site ‘mail.twc.com’ and find the login panel on the page. After that, enter your username and password and then tap “Log in” button to successfully log in to your account.

Put A Ring At Toll-Free Number If Having Any Query

Being a non-tech person, it might be possible that you can confront glitches while login to your Roadrunner Webmail account. To get rid of the issues that appear when following the aforementioned instructions, you only have to give an instant ring on helpline number. We have a technical team of staff active round the clock only for your support. Hence, dial the toll-free number and stay tuned without any hassle.

Source Link :- https://dailygram.com/index.php/blog/609809/how-to-create-webmail-roadrunner-login-account/

Apply AOL Gold Download Steps from this guide

AOL Gold download is the phenomenon that the user has to perform to avail AOL desktop gold features. The company includes simple steps to download and install the software. If you too want to access the best features and functions of the AOL platform, go through this article and follow the instruction as per the guidance.

Know about AOL Desktop Gold
• Language: English
• Version: Gold
• Size: 15mb
• License: $4.99 USD/ month
• Developer: AOL

Basic Requirement for AOL Gold Download
• OS: Windows 7, Windows 8, Windows 8.1, Windows 10
• Processor: 266 MHz or above
• Screen Resolution: 1024*768 or above
• Memory: 1 GB RAM, 512 Mb hard disk space
• Internet: High-speed internet required

Steps AOL Gold Download Process
AOL Gold is compatible with both Windows and Mac. Both have different download process. Apply the procedure as per your requirement i.e. Windows or Mac. Let’s begin:

Windows

For AOL Plan Member
If you have a membership, then you need to carry out the following step

  • Log in to your MyBenefits account
  • Go to ‘All Products’ option
  • Search for AOL Desktop Gold
  • Tap on ‘Download Now’

For Trial AOL Gold Trail Version

  • Login to My Account
  • Tap on My Services>Subscription
  • Lastly, click ‘Get started’ located under AOL Desktop Gold

Mac

For AOL Active Member

  • Go and login to MyBenefits
  • Thereafter, navigate to ‘All Products’Find
  • AOL Desktop Gold from the menu
  • Lastly, click on Download Now

For the subscription holder of AOL Desktop Gold

  • Login to My Account page
  • Navigate to My Services>Subscription>AOL Desktop Gold
  • Tap on getting Started for starting the AOL Gold download process

How to Install AOL Desktop Gold?

The installation process is also different for both Windows and Mac. Try and apply the steps accordingly:

Windows

  • Go to the default location where downloaded files are saved
  • Locate your file
  • Run the .exe file as Administrator with right-click on it
  • Follow the on-screen instruction to complete the installation of AOL Gold

Mac

Features of AOL Desktop Gold

Before buying anything, we first know about that product. In the same way, prior to AOL Gold Download, look at the features:

  • It includes simplified downloading and installing process
  • Automatic Update feature helps to update the software to the latest version automatically
  • You can enable or disable the screenshot option in the concern of protecting your private information
  • Users need not worry about their data that was stored in the previous version. With the import wizard feature all information like username, the saved password gets transferred in the latest version
  • Enhanced security is available with two-step verification that protects the software with cyber threats

Common Issues with AOL Desktop Gold

Here is some frequent Error that occurs. However, these issues are not due to any problem in AOL software but because of a technical fault. Check out the issues:

  • Unable to apply AOL Gold Download process
  • Failing to create default email signature in AOL Desktop gold
  • What are the steps to clear the browser’s cache on AOL Desktop Gold?
  • Unable to print from AOL Desktop Gold

Technical Assistance

In case you are not able to apply the AOL Gold Download process, don’t worry. The technical team is available to help you. You simply need to contact the experts and convey them to the existing issue. Professionals are well-versed and can rectify the problem instantly. Provide them the proper details that they require and get your issue solved. The availability is all round the clock, 24*7.

Apply Simple steps of Roadrunner Email Setup process

Roadrunner email provides superb email service helping big organizations in their professional world. Roadrunner service is basically provided by the popular communication-based firm, Time Warner Cable (TWC) Internet Service Provider. The email includes various features and hassle-free services. And the setup process is not tedious to perform. If you too require the process to install Roadrunner, this guide is meant for you.

Perform the steps from this article for webmail Roadrunner and configure the settings of the setup process. Once you successfully setup Roadrunner, you will be able to use the interesting features of it. Read further for the guidelines of the Roadrunner email setup procedure.

Basic Requirement for Roadrunner setup process

Have a look of few basic requirements of setup
• High-speed internet connectivity
• Sufficient RAM space
• Browser free from viruses and bugs
Easy Steps to Setup Roadrunner Email
Apply each step for the Roadrunner email setup to successfully run.
• Go to Email app and Open
• Type your Roadrunner email address and click ‘Next’
• Select ‘Personal (POP3)’, and then tap ‘Next’
• Mention the Incoming Server Setting Details
• Username: enter full email address including @maine.rr.com
• Password: type Roadrunner webmail password
• Server: pop-server.maine.rr.com
• Port: 110
• Security Type: None
• Next, Outgoing Server Setting Information
• Server: smtp-server.maine.rr.com
• Port: 587
• Security Type: None
• Require sign-in: Tick mark
• Username: username@maine.rr.com
• Password: Your Roadrunner email password
• Click ‘Next’ and then tap on ‘Next’ again
• Thereafter, mention your name in required box. (People who will receive mail will see your name)
• Click ‘Next’
• In case, the above settings fail to work choose alternative server settings
• Incoming server: pop-server.rr.com
• Outgoing server: smtp.rr.com
Procedure to Manually Setup Roadrunner Email
• Open Application and click ‘My Accounts’
• Select ‘Add Account’
• Give you full Roadrunner email address including @_.rr.com name (all in lower case)
• Deselect automatically configure the account
• Tap ‘Next’
• Click on General Settings (Verify the details of General Settings)
• Make necessary changes if required
• Tap ‘OK’
• Click on Incoming server
• Then, Outgoing server
• Type POP3 server: pop-server.si.rr.com
• Port- 110
• Furthermore, type username and password
• Deselect Use Secure server
• Remove tickmark for Verify certificate
• Click OK
• Now, select Outgoing server
• Type SMTP server- smtp-server.si.rr.com
• Again, uncheck User Secure server
• Type Port: 25
• Thereafter, hit OK to submit email setup
Alternative Method to fix Roadrunner Email

In case, you were not able to follow the Roadrunner email setup, you can take help from Experts. They will assist you throughout the process. Thus, the user can directly be assisted without any difficulty in a lack of technical knowledge. You simply have to share your Roadrunner email query. Professionals will revert you instantly within no time. In addition, you can also ask for the latest updates. This option to directly getting in touch can save your much time and you can perform in one attempt. Therefore, if you require their assistance, contact them. Availability is 24*7

View Source :- https://jemasjoin.wixsite.com/roadrunneremail/post/apply-simple-steps-of-roadrunner-email-setup-process

What are easy tips to setup roadrunner email? Recommend strongly

Roadrunner is one of the most efficient emailing applications that thousands of users, both personally and professionally, are presently using.  This emailing application has a lot of amazing features that can perfectly match with all users’ needs. Using roadrunner email service has a lot of benefits, so you can use it for various purposes.

An online & Complete Guide Is Available for Roadrunner email setup

If you’re a new user and looking for setting up Roadrunner email, you should have technical expertise. If you’re troubling hardly for roadrunner email setup issue, you need to follow below steps to complete the procedure.

Easy Steps to Use Roadrunner to Setup an Email Account

Here, we are going to share some easy instructions to setup a roadrunner email account using roadrunner email settings properly.

  • You should hit on “My Accounts” option
  • You must open the applications and choose “Add account” button
  • Now, you’re on “set-up accounts” option, and many other social media network icons are available.
  • You have to click on icon for roadrunner email setting.
  • Now, you should enter your full email address for roadrunner, you should follow in such ways like ‘ @-.rr.com.’ Check carefully that it is all in the lower case.
  • Now, you need to type the password in the given space
  • Next, you should skip “Automatic account configuration” button
  • You have to click on “next” option
  • Your phone will directly connect to the server of emails. You will observe “Success”, if the email account is setup rightly.
  • Finally, your email configuration process for roadrunner email is complete successfully. You can check out the setup process just by sending and receiving email. Now, Roadrunner email setup process is finished effectively.

Another Troubleshooting Solution

Thereby by applying all the above technical steps, you can use roadrunner email account for various purposes. These instructions are very helpful for you, so you can apply them appropriately. Still, if you’re experiencing any kind of technical issues, you can get connected with technically trained technical experts available round the clock.

View Sources :- https://roadrunneremailsetup.webflow.io/posts/what-are-easy-tips-to-setup-roadrunner-email-recommend-strongly

Design a site like this with WordPress.com
Get started